Hello once again!
It’s been a while since we last saw each other. Ha ha. Check out that front look! Those are some gorgeous images! Anyway, I’ve got some exciting news but first, lets recap or catch-up.
In part 3 of this series, we saw how to manage users for our app. Specifically we looked into how to create users, blueprints and admins to add backend content to our app. We also experimented a bit with various styles.
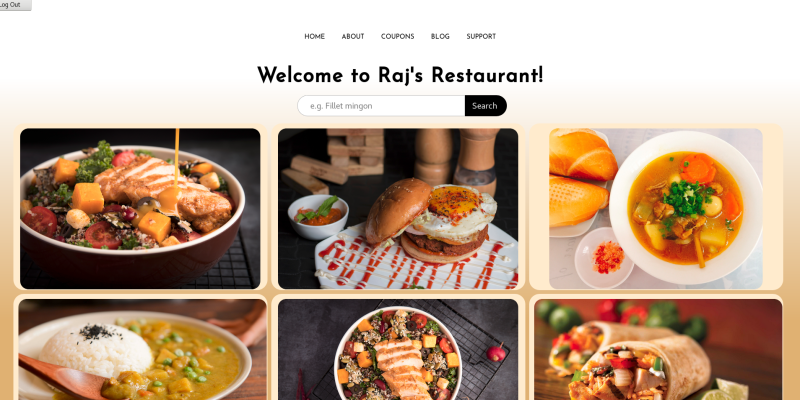
The app looks pretty neat on the desktop as well as on mobile screens.
Now the exciting stuff;
- Managing credentials for development purposes
Migrations,migrations,migrations- Adding
yummyfood images to our app Checkout!comes to our appCreating apart 5blogBlueprint
Your app should look gorgeous by the end of this post.
Managing credentials for development
In part 2 I suggested we use pydotenv to manage our app secrets, things like the database password and so on;
import pydotenv
env = pydotenv.Environment()
SQLALCHEMY_DATABASE_URI = 'postgresql://username:'+env['DB_PASSWORD']+'@localhost:5432/raj_db'
However, there was a problem, my app was not connecting to my database - raj_db.
I openned up a python shell to test the pydotenv package and sure enough it didn’t work for mypassword.
I had a number of options;
- Change my database password to one that works with pydotenv.
- Fork
pydotenvand fix and use it instead of the original one.
I opted to go with option 2.
So I headed over to the git repository of the pydotenv package to find our why my password was being split.
This is what I found;
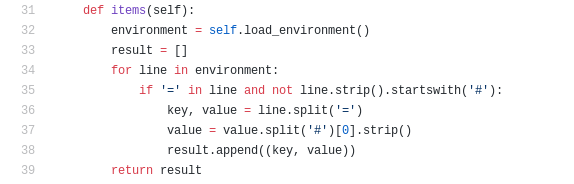
This is the function that parses each line from the .env file. The code for the parser is wrong!
That is if your password contains the # symbol.
Secondly, the author doesn’t warn users about this shortcoming. If you’re stuck here it’s better to add a comment stating that the parser does not work for passwords containing the # symbol.
The solution to me was obvious, replace the # with a single space.
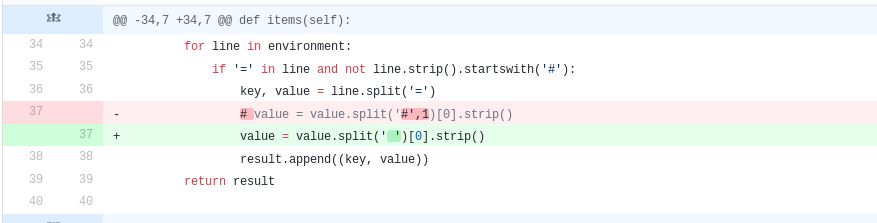
Of course I had to fork the original project to do this since the project itself appears to be abandoned. I commited my changes and pushed the fix to my fork of pydotenv. I didn’t really have time to do a pull request because I didn’t think my fix was robust enough for people whose passwords might contain spaces.
Incorporating our solution
After testing that the fix worked, it was time to import my own version of pydotenv.
I did this by generating a requirements.txt file;(pyenv) pip freeze -r > requirements.txt
Then I opened requirements.txt and replaced pydotenv with git+https://github.com/lehbyte/pydotenv.git#egg=pydotenv
Finally, I then ran; (pyenv) pip install -r requirements.txt and my app was finally able to connect to my database raj.db.
Of course all of this would have been done by simply navigating to the pydotenv package within my virtualenv pyenv and applying the fix there but then I wouldn’t be able to do a pull request and you wouldn’t be able to download my fix to use. :(
Modifying config.py
Ok since pydotenv works, it’s time to update our config.py;
import os
import pydotenv
env = pydotenv.Environment()
basedir = os.path.abspath(os.dirname(__file__))

FLASK_ADMIN_SWATCH = 'cerulean'
TEMPLATES_AUTO_RELOAD = True

SQLALCHEMY_DATABASE_URI = 'postgresql://'+env['USER']+':'+env['PASS']+'@localhost:'+env['PORT']+'/'+env['DB']
SQLACHEMY_TRACK_MODIFICATIONS = False

WTF_CSRF_ENABLED=True
SECRET_KEY='mysecretkey'
.env
FLASK_APP=app
FLASK_ENV=development
USER=your_username
PASS=your_password
PORT=5432
DB=your_database
Migrations, migrations, migrations
Usually when we change something in our models.py we have to delete and recreate our database from scratch all over again.
This is very inconvenient during development so we need a tool that will make the changes for us without deleting and recreating the entire database.
That tool is flask-migrate. Let’s install it;
(pyenv) pip install flask-migrate
Now lets initialize our app for migrations;
from flask_sqlalchemy import SQLAlchemy
from flask_migrate import Migrate
from flask_admin import Admin
from app import raj

db = SQLAlchemy(raj)
migrate = Migrate(raj, db)
admin = Admin(raj)

class User(db.Model):
    id = db.Column(db.Integer, primary_key=True)
    username = db.Column(db.String(80), unique=True, nullable=False)
    email = db.Column(db.String(120), unique=True, nullable=False)

    def __repr__(self):
        return '<User %r>' % self.username
Once installed we have to follow the following step to get it setup;
flask db initflask db migrate- *
flask db upgrade
The last step is not necessary after the first migration but it is important after every subsequent migration.
Once you have done that let us make some changes to our models.py to see if this will work.
If you remember, we created a food Item in part 2 part 2;
Let us add one thing; image and remove unique on everything else;
Updated model.py
class FoodItem(db.Model):
    id = db.Column(db.Integer, primary_key=True)
    name = db.Column(db.String(80), nullable=False)
    desc = db.Column(db.String(250), nullable=False)
    price = db.Column(db.Float, nullable=False)
    image = db.Column(db.String(50))
    prep_time = db.Column(db.Integer, unique=True, nullable=False)
    #date =

    def __repr__(self):
        return '<Food Item %r' % self.title
Now let us migrate and upgrade;
(pyenv) flask db migrate
(pyenv) flask db upgrade
If all went well then you should receive 0 errors. Remeber to run those two commands everytime you change something in your models! If you get any problems post them in the comment section below.
Adding food images to our app
Where to find good images.
Go to pexels.com and search fod food. You will find a lot of nice looking images. Download the ones you like and put them in your /static/img/ folder.
Adding the images
Let’s modify our FoodItem model to include a string field for the image path;
class FoodItem(db.Model):
    __tablename__ = 'food_item'
    id = db.Column(db.Integer, unique=True, primary_key=True)
    title = db.Column(db.String(80), nullable=False)
    desc = db.Column(db.String(250), unique=True, nullable=False)
    price = db.Column(db.Float, nullable=False)
    prep_time = db.Column(db.Integer, nullable=False)
    image = db.Column(db.String(250), index=True)
    date_added = db.Column(db.DateTime)
Let us migrate those changes;
$(pyenv) flask db migrate$(pyenv) flask db upgrade
Now run your app $(pyenv) ./run.py and navigate to localhost:3000/admin/FoodItem to begin adding items. For the image field just put the name of the image. For example,
burger.jpg and do that for every food item you add.
Make sure that every food item has an image with the file name of an image that actually exists in your /static/img folder.
FrontEnd
Let’s load the images into our home page.
First, import FoodItem from your models at the top of your views.py;
app/views.py
...
from app.models import FoodItem
...
Then, update your home function in your views;
app/views.py
@raj.route('/')
@raj.route('/home')
@raj.route('/index')
@templated()
def home():
    # user = g.user
    # food_items = app.Models.FoodItem
    return dict(title=app_name, user=user, dishes=FoodItem.query.all())
Now we can use dishes in home.html;
app/templates/home.html
...
<div class="food-grid">
    {% for dish in dishes %}
    <div class="food-item">
        <img src="{{ url_for( 'static', filename='img/' + dish.image ) }}" alt="" />
        <div class="food-box">
          <p><span>Dish #: </span> {{ dish.id }} </p>
          <a class="food-link" href="/add/{{ dish.id }}"> Add to tray </a>
        </div>
    </div>
    {% endfor %}
  </div>
...
The images do load but they aren’t responsive, i.e. they do not fit within our menu-grid system.
For that, we need responsify.js.
Download responsify.js and responsify.min.js into your static/js/ folder.
Since both scripts use jQuery we need to download it as well, then we have to include all scripts at the bottom of our base.html like this;
app/templates/base.html
...
    </main>
    <!-- JavaScripts -->
    <script
        src="https://code.jquery.com/jquery-2.2.4.min.js"
        integrity="sha256-BbhdlvQf/xTY9gja0Dq3HiwQF8LaCRTXxZKRutelT44="
        crossorigin="anonymous">
     </script>
     <script src="static/js/responsify.js"></script>
     <script src="static/js/main.js"></script>
  </body>
  <!--body -->
...
Then we can use responsify.js in our main.js like so;
app/static/js/main.js
$(document).ready(function(){
    $(window.onload(function(){
        $('img').responsify();
    }));
    $(window).resize(function(){
        $('img').responsify();
    });
});
The Tray function
app/views.py
@raj.route('/add/<int:dish>', methods=['GET','POST'])
def add():
    # associate this dish with the current user
    return redirect("previous URL")
What this function will do is associate the current user with the FoodItem id that was passed in. In order to do that we have to create a database relationship between the User and the FoodItem.
We will do this in part 5
After making the association we will redirect the user to the previous URL and flash them a message stating that the item was added to the chart.
What other things do we need to do? We need to define a checkout process.
Checkout!
Remeber that a user needs to be able to;
- Add items onto a cart
- See a complete break down of charges, including taxes
- Have the option to accept or cancel at any point before their card is charged
- Be able to choose from a variety of payment options
- Receive a receipt of the transaction
Let us try to implement some of these features;
The checkout function
app/views.py
...
@raj.route('/checkout')
def checkout():
    current_user = g.user
    subtotal = sum( g.user['tray'] )
    taxes = calc_tax( subtotal )
    total = subtotal + taxes
    return render_html('checkout.html', total=total, subtotal=subtotal, taxes=taxes)
...
sum calculates the total price of all the food items in the current_user’s tray.
We will look at how the current user is determined later on.
...
def sum(tray):
    total = 0
    for dish in tray:
        total += dish.price
    return total
...
calc_tax calculates the amount of tax to be paid from the subtotal obtained previously
Then we calculate the total and send this information to the checkout.html template via three variables, total, subtotal, and taxes.
The pay function
This will be the second view the user will be presented with and immediately follows the checkout view, provided nothing goes wrong there.
In checkout.html we will need to send the total_price to the pay route somehow;
<a href="/pay/{{ total_price }}"> Accept </a>
Now we can use the total_price to charge the user’s card.
app/views.py
@raj.route('/pay/<float:total_price>')
def pay():
    # Choose a method of payment
    # PayPal
    # SquareCash
    # Visa/MasterCard
    # Venmo/Zelle/Other
    payment = verify( total_price )
    paycode = payment.code
    if payment.successful:
        receipt = generate_receipt( g.user['tray'], total_price )
        return render_template('payment_success.html', receipt=receipt, status_code=paycode)
    else:
        return render_template('payment_failure.html', status_code=paycode)
...
verify simply checks to see that the payment went through.
We will see how to define this function in part 5but it should be clear what we expect from verify; an object with atleast the following members;
- A status
code# a code for describing the status of the verification - A
booleansuccessfulto indicate that the payment was successful.
A status code is important for troubleshooting. Payments might fail for a variety of reasons;
- Customers might have insufficient funds in their account
- The banking services might be down due to maintainence e.t.c
- The user might have entered the wrong credentials
- Restaurant owner’s bank might not accept funds from customer’s bank
- e.t.c
A status_code that describes each problem mentioned above will make troubleshooting for both customer and restaurant owner much easier.
payment_succes.html and payment_failure.html should be pretty straightforward templates to write.
We shall complete the checkout part of our app in the next post until then,
happy coding :)
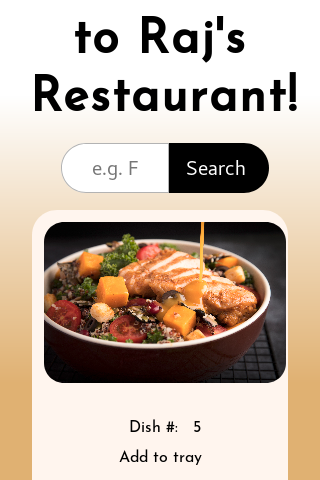
PS: Here’s what our images look line on mobile;